
I’ll never forget the first time I stumbled upon the magic of Apple Crisp. It was a chilly fall evening, and my kitchen was a mess of apple peels and cinnamon dust after a long day of experimenting with dessert recipes. My family gathered around, skeptical at first, but one bite of that warm, gooey Apple Crisp, and they were hooked—my husband even declared it better than his grandma’s pie!
There’s something about the sweet, tart apples mingling with a buttery, crunchy topping that just screams comfort. I’ve been perfecting this recipe for years now, tweaking it here and there to get that perfect balance of flavors. Stick with me, and I’ll show you how to whip up this crowd-pleaser in your own kitchen!
Why You’ll Love This Recipe
I’ve found that Apple Crisp is one of those desserts that never fails to impress, whether it’s for a family dinner or a last-minute potluck. It’s ridiculously easy to throw together, even if you’re not a baking pro, and the ingredients are stuff you probably already have in your pantry. Plus, the smell of it baking? Pure heaven!
In my kitchen, this recipe has become a go-to for fall gatherings, but honestly, I make it year-round because it’s just that good. The combo of tender apples and that crispy, golden topping is a texture dream. Trust me, once you try it, you’ll be making it on repeat!
Ingredients List
Let me tell you, the key to a killer Apple Crisp is using fresh, quality ingredients, but don’t stress too much—I’ve made this with slightly overripe apples and it still turned out amazing. I usually buy Granny Smith apples for their tartness, but I’ll mix in a sweeter variety like Honeycrisp if I’m feeling fancy. Here’s everything you’ll need to make this dessert a reality.
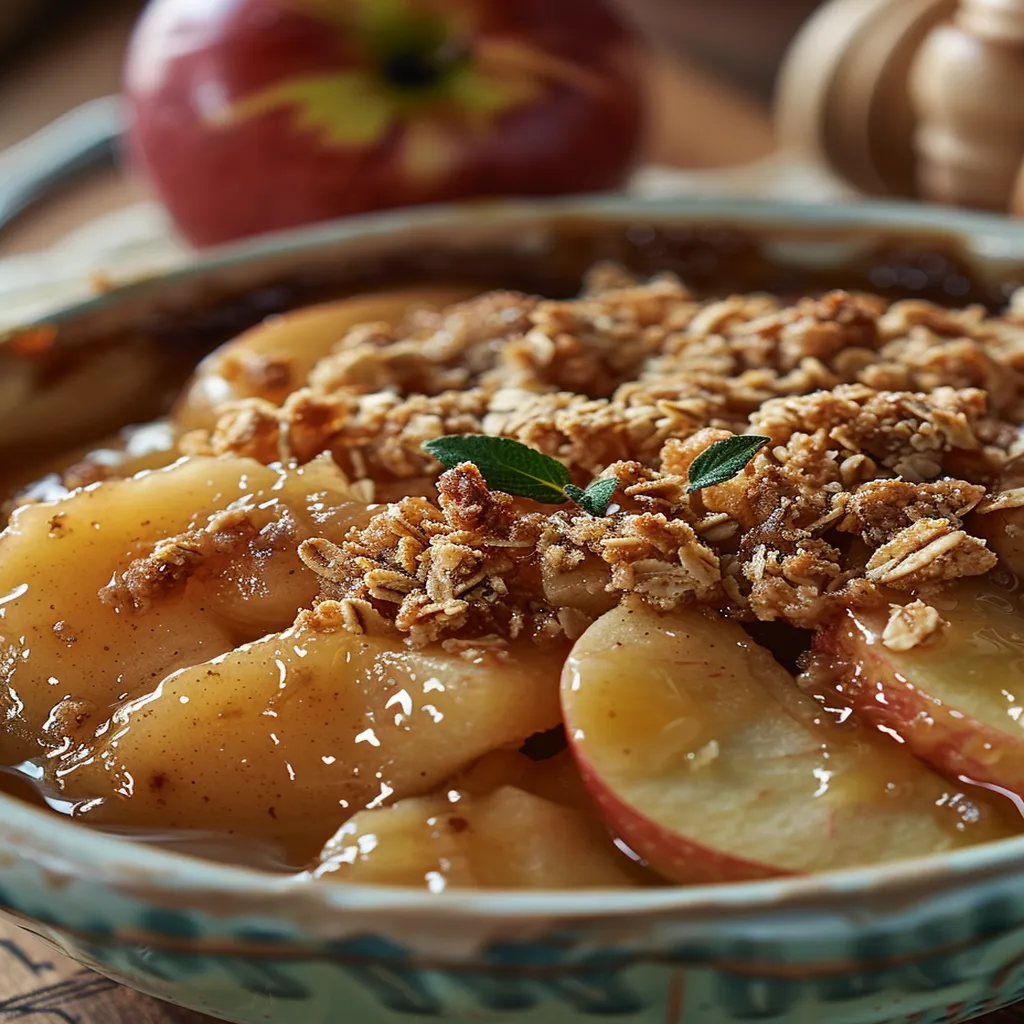
For the Apple Filling
- 6 medium apples (about 2.5 lbs or 1.1 kg), peeled, cored, and sliced thin—I prefer Granny Smith for that tangy bite
- 1/2 cup (100g) granulated sugar, to sweeten things up
- 1 tablespoon (8g) all-purpose flour, to thicken the juices
- 1 teaspoon (2g) ground cinnamon, for that warm, cozy vibe
- 1/4 teaspoon (1g) ground nutmeg, just a pinch for depth
- 1 tablespoon (15ml) lemon juice, to keep the apples from browning and add a zesty kick
For the Crisp Topping
- 1 cup (125g) all-purpose flour, for structure
- 3/4 cup (150g) brown sugar, packed—I love the caramel notes this adds
- 1/2 cup (45g) old-fashioned rolled oats, for that hearty crunch
- 1/2 teaspoon (2g) ground cinnamon, to tie it to the filling
- 1/2 cup (115g) unsalted butter, cold and cut into small cubes—don’t skimp on this, it’s the secret to crispy goodness!
- 1/4 teaspoon (1g) salt, to balance the sweetness
I’ve learned over time that cutting the butter in cold makes all the difference for that “crisp” in Apple Crisp. And if you’ve got a few extra minutes, toast the oats lightly in a pan first—game-changer!
Variations
One of the reasons I’m obsessed with Apple Crisp is how easy it is to switch things up based on what I’ve got in the fridge or what mood I’m in. I’ve tried all sorts of twists over the years, some by accident and others on purpose, and my family always has an opinion on which is best. Here are a few of my favorite ways to remix this classic dessert—give ‘em a shot!
- Nutty Crunch: Toss in 1/2 cup of chopped walnuts or pecans to the topping for an extra layer of texture. I tried this once for a holiday dinner, and my sister hasn’t stopped raving about it.
- Berry Blast: Mix 1 cup of fresh or frozen blueberries or raspberries with the apples for a tart-sweet vibe. This was a happy accident when I ran out of apples one day—turned out delish!
- Caramel Drizzle: Drizzle 1/4 cup of store-bought caramel sauce over the apples before adding the topping. My kids beg for this version every time.
- Spiced-Up Kick: Add 1/4 teaspoon of ground cloves or allspice to the filling for a bolder flavor. I’m a spice nut, so this is my personal fave.
- Gluten-Free Swap: Use gluten-free flour and certified gluten-free oats in the topping. I made this for a friend with allergies, and honestly, you can’t tell the difference.
- Coconut Twist: Sprinkle 1/4 cup of shredded coconut into the topping for a tropical hint. I wasn’t sure about this at first, but it grew on me quick!
- Boozy Boost: Add 2 tablespoons of bourbon or rum to the apple mixture for a grown-up edge. (Don’t worry, the alcohol bakes off—just leaves a killer flavor behind!)
Apple Crisp is so forgiving that you can play around and make it your own. I’d love to hear what variations you come up with in your kitchen!
Servings and Timing
In my experience, this Apple Crisp recipe serves about 6-8 people, depending on how generous you are with the portions (or how much self-control everyone has!). It’s perfect for a small gathering or a family dessert with leftovers for the next day. Here’s the breakdown on timing to help you plan.
- Prep Time: 20 minutes
- Cook Time: 45 minutes
- Total Time: 1 hour 5 minutes
It usually takes me a bit longer if I’m chatting with someone while peeling apples, but an hour is a solid estimate. You’ll be digging into warm, delicious dessert before you know it!
Step-by-Step Instructions
Alright, let’s get down to business and make this Apple Crisp happen. I’ve broken it down into 12 easy steps, and I’m tossing in some of my personal tricks to help you nail it on the first try. I’ve made this so many times I could probably do it blindfolded, so trust me when I say it’s simpler than it looks!

Step 1: Preheat Your Oven
Kick things off by preheating your oven to 350°F (175°C). I always pop a baking dish in there to warm up slightly—it helps the bottom cook evenly.
Step 2: Grease the Dish
Grab a 9×9-inch baking dish and lightly grease it with butter or cooking spray. I’ve skipped this step before, and let’s just say scraping stuck-on Apple Crisp ain’t fun.
Step 3: Peel and Slice Apples
Peel, core, and slice your 6 medium apples into thin wedges. I aim for about 1/4-inch thick so they cook down nice and tender without turning to mush.
Step 4: Mix the Filling
In a big bowl, toss the apple slices with sugar, flour, cinnamon, nutmeg, and lemon juice until they’re all coated. I like to get in there with my hands—makes sure every piece gets some love.
Step 5: Layer the Apples
Spread the apple mixture evenly into your prepared dish. Don’t worry if it looks piled high; it’ll shrink as it bakes.
Step 6: Start the Topping
In another bowl, mix the flour, brown sugar, oats, cinnamon, and salt for the topping. I usually whisk it quick to break up any sugar clumps.
Step 7: Cut in the Butter
Add the cold, cubed butter and use a pastry cutter or your fingers to work it into the dry mix until it looks like coarse crumbs. I’m a fingers girl—it’s messy but faster!
Step 8: Check the Texture
You want pea-sized butter bits in there for flakiness. If it’s too wet, toss in a tablespoon more flour. I learned this trick after a soggy-topping disaster.
Step 9: Sprinkle the Topping
Evenly scatter the crumbly topping over the apples. Don’t press it down—let it stay loose for that signature Apple Crisp crunch.
Step 10: Bake It
Pop the dish in the oven and bake for 40-45 minutes until the topping is golden and the apples are bubbling. The smell will drive you nuts, I swear!
Step 11: Check for Doneness
Poke a fork into the apples to make sure they’re soft. If the topping browns too fast, tent it with foil halfway through—I’ve saved many a batch this way.
Step 12: Cool Slightly
Let your Apple Crisp cool for 10 minutes before serving. It’s tough to wait, but it helps the juices set a bit. Now, dig in!
Nutritional Information
I’m no dietitian, but I like to keep an eye on what I’m serving up, especially with a dessert like Apple Crisp. Here’s the rough breakdown per serving (based on 8 portions). Keep in mind, this can vary depending on your exact ingredients or portion size!
- Calories: 320 per serving
- Fat: 12g
- Protein: 3g
- Carbohydrates: 52g
- Sodium: 150mg
It’s not exactly health food, but hey, it’s a treat worth savoring. I usually balance it out with a lighter dinner beforehand.
Healthier Alternatives
If you’re looking to lighten up your Apple Crisp, I’ve got a few swaps I’ve tried that don’t skimp on flavor. I’m all about indulgence, but sometimes I’m watching my sugar or fat intake, and these tweaks help. Give ‘em a whirl if you’re in the same boat!
- Sugar Substitute: Cut the granulated sugar in the filling to 1/4 cup and add 2 tablespoons of maple syrup instead. It’s a natural sweetener I love.
- Lower Fat: Swap half the butter in the topping for unsweetened applesauce. I’ve done this, and while it’s not as rich, it still gets that Apple Crisp vibe.
- Whole Grain: Use whole wheat flour instead of all-purpose for a bit more fiber. It’s a subtle change, but I feel a tad less guilty!
These options let you enjoy the dessert without totally derailing your goals. Play around and see what works for you.
Serving Suggestions
I love serving Apple Crisp in all sorts of ways, depending on the occasion or just what I’m craving. It’s such a versatile dessert that it pairs beautifully with a few classic add-ons. Here are my go-to ideas for making it extra special.
- Classic Touch: Add a scoop of vanilla ice cream on top while it’s still warm. The melty, creamy contrast with Apple Crisp is unbeatable!
- Cozy Vibes: Serve with a dollop of whipped cream and a sprinkle of cinnamon. I did this at my last dinner party, and everyone raved!
Whether it’s a casual weeknight or a holiday feast, these little extras take it over the top. How do you like to serve yours?
Common Mistakes to Avoid
I’ve botched Apple Crisp more times than I’d like to admit, but those mess-ups taught me what not to do. Trust me on this one, avoiding these pitfalls will save you a headache. Here are the biggies I’ve learned the hard way.
- Overcooking Apples: Don’t pre-cook the apples before baking—they’ll turn to mush in the oven. I made this mistake once, and it was like eating baby food.
- Skimping on Butter: Cutting back too much on butter in the topping leaves you with a dry, sad Apple Crisp. I tried it to save calories and regretted it instantly.
Stick to the recipe the first time around, and you’ll dodge these rookie errors. What flubs have you run into?
Storing Tips
I’ve found that Apple Crisp keeps pretty well if you store it right, which is great ‘cause I love nibbling on leftovers. Here’s how I keep mine fresh for as long as possible. These tips have saved me many times!
- Refrigerator: Store in an airtight container for up to 4 days. Reheat in the oven at 300°F for 10 minutes to crisp it back up.
- Freezer: Freeze unbaked or baked portions for up to 2 months. Just thaw overnight before reheating.
A quick zap in the microwave works too if you’re impatient like me. It’s never quite as good as fresh, but close enough!

FAQs
I get a ton of questions about making Apple Crisp, so I’ve rounded up the most common ones I hear from friends and readers. Let’s tackle these head-on with some real-talk answers based on my own trials and errors.
Can I use different apples for Apple Crisp?
Absolutely, you can! I usually stick with Granny Smith for tartness, but Fuji or Gala work if you want it sweeter. Just avoid super soft ones like Red Delicious—they get too mushy.
Do I have to peel the apples?
Nah, you don’t have to, but I always do. The peels can get a weird texture after baking, in my opinion. If you’re in a rush, leave ‘em on and see what you think!
Can I make Apple Crisp ahead of time?
Yep, you sure can. Assemble everything up to the baking step, cover it, and refrigerate for up to a day. Bake it fresh when you’re ready—smells amazing that way.
How do I reheat leftovers?
I pop mine in the oven at 300°F for about 10-15 minutes to revive the crunch. A microwave works if you’re in a hurry, but it might get a bit soggy.
Can I double the recipe?
Go for it! I’ve doubled it for big family gatherings using a 9×13 dish. Just add 5-10 minutes to the baking time and keep an eye on the topping.
Is this recipe gluten-free?
Not as written, but swap the flour for a gluten-free blend and use certified GF oats. I’ve done it for a friend, and it’s just as tasty.
Why is my topping soggy?
Could be too much butter or not enough baking time. Make sure your butter’s cold when you mix it, and bake until golden. I’ve had this happen, and it’s a bummer!
Can I add other fruits?
For sure! I’ve tossed in pears or berries with great results. Just keep the total fruit amount about the same, and you’re golden.
Conclusion
I hope you’re as pumped as I am to whip up this Apple Crisp in your kitchen. It’s honestly one of my favorite recipes to share because it’s so darn easy and always brings smiles. Whether it’s your first time or you’re a seasoned baker, I’d love to hear how it turns out for you—drop me a note or tag me with your pics!