
Hey there, fellow dessert lovers! I’ve gotta share something that’s been a game-changer in my kitchen: my obsession with crafting the perfect Chocolate Peanut Butter Pie.
The first time I whipped one up, it was a total mess—think crumbly crust and a filling that just wouldn’t set—but oh man, when I finally nailed it, my family went nuts. They still beg me to make this silky, decadent treat for every birthday and holiday!
If you’re anything like me, you’re always on the hunt for a dessert that’s equal parts indulgent and doable. Well, buckle up, because I’m spilling all my hard-earned tips to help you create a Chocolate Peanut Butter Pie that’ll have everyone scraping their plates. Let’s dive into the sweet, nutty goodness together, shall we?
Why You’ll Love This Recipe
I’ve gotta say, there’s something downright magical about this Chocolate Peanut Butter Pie that keeps me coming back to it. In my kitchen, it’s become the go-to dessert when I wanna impress without spending hours slaving over a hot stove. The combo of creamy peanut butter and rich chocolate hits all the right notes—pure comfort in every bite!
And here’s the kicker: it’s way easier than it looks. I’ve found that even newbie bakers can pull this off with a little guidance. Whether you’re making it for a potluck or just a cozy night in, trust me, this pie is gonna steal the show.
Ingredients List
Alright, let’s chat about what you’ll need to make this Chocolate Peanut Butter Pie a reality. I’m super picky about my ingredients because, in my experience, quality makes a huge difference in how the flavors pop. So, I’ve listed everything with exact measurements and a few personal notes on what I prefer to use.
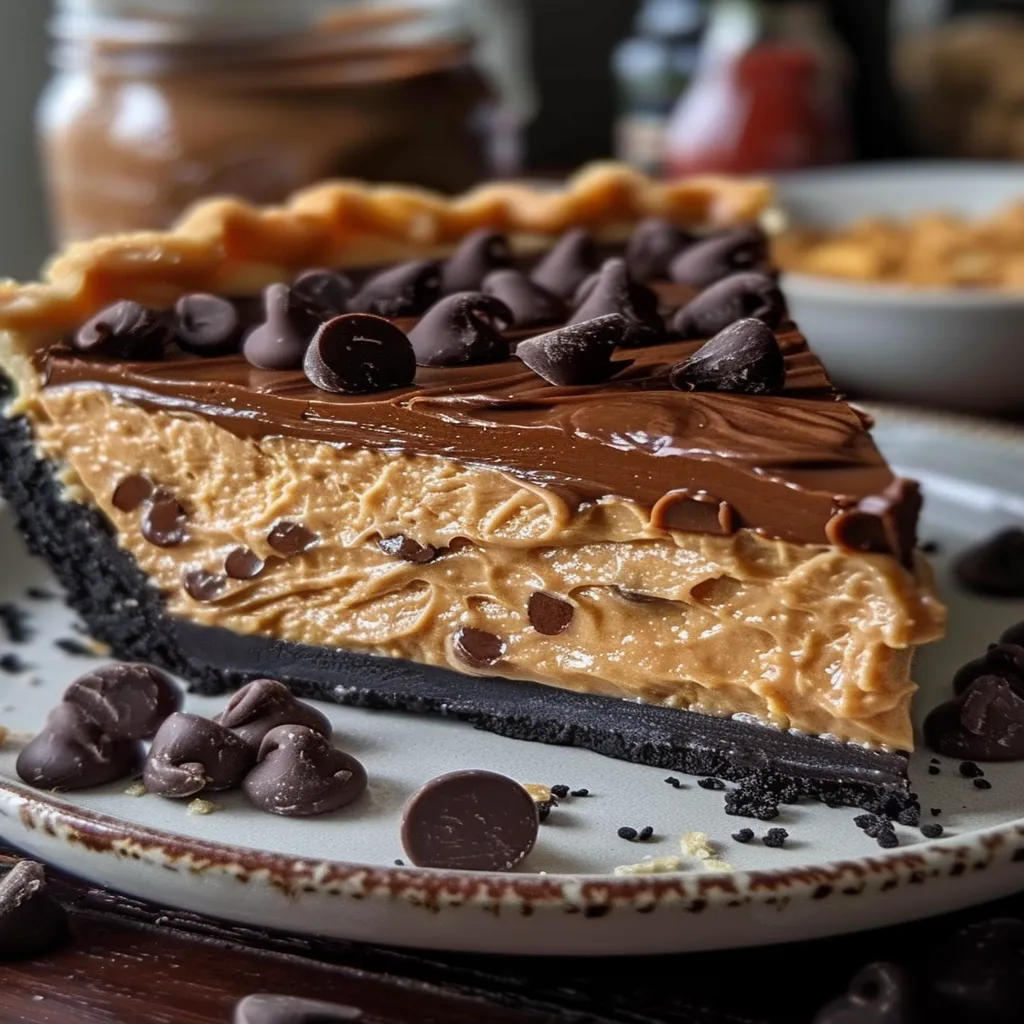
Crust
- 1 1/2 cups (180g) chocolate cookie crumbs, like Oreos with the filling scraped out—I usually blitz them in my food processor for a fine texture.
- 1/4 cup (55g) unsalted butter, melted, because salted can throw off the balance, and I’m all about control in my crust.
- 2 tablespoons (25g) granulated sugar, to give that subtle sweetness—I stick to regular white sugar here.
Filling
- 8 oz (225g) cream cheese, softened, full-fat for that lush richness—trust me, don’t skimp with the low-fat stuff.
- 1 cup (250g) creamy peanut butter, I always grab a natural brand with no added sugar; it just tastes cleaner.
- 1 cup (120g) powdered sugar, sifted if it’s clumpy—I hate lumps in my filling!
- 1 teaspoon (5ml) vanilla extract, pure, not imitation, for that warm depth.
- 1 1/2 cups (360ml) heavy whipping cream, chilled, because it whips up fluffier that way.
Topping
- 1/2 cup (120ml) heavy cream, for that glossy ganache finish.
- 4 oz (115g) semi-sweet chocolate, chopped, I usually go for a 60% cacao bar—bittersweet perfection.
- 2 tablespoons (30g) peanut butter chips, optional, but I toss them on for extra flair.
These are the building blocks of dessert heaven. I’ve tweaked this list over countless batches, so I know it works like a charm!
Variations
Now, let’s get creative with this Chocolate Peanut Butter Pie! I love playing around with flavors and textures, and over the years, I’ve tried some wild twists that turned out amazing.
Here are a few variations that might just tickle your taste buds—some I’ve stumbled upon by accident, others by request from my picky eaters (aka my kids). Feel free to mix and match based on what you’ve got in your pantry.
- Salty Caramel Crunch: Drizzle some store-bought or homemade caramel sauce over the top and sprinkle with a pinch of flaky sea salt. I tried this once for a friend’s baby shower, and it was a total hit—sweet and salty perfection.
- Banana Boost: Layer thin banana slices between the crust and filling for a tropical vibe. My husband’s obsessed with this combo!
- Oreo Overload: Mix extra crushed Oreos into the filling for a double chocolate punch. My kids always ask for this version.
- Nutty Twist: Swap half the peanut butter for almond butter if you’re feeling fancy. I did this on a whim, and it added such a cool, toasty note.
- Mocha Magic: Add 1 teaspoon of instant espresso powder to the filling for a subtle coffee kick. I’m a caffeine junkie, so this is my personal fave.
- Reese’s Remix: Chop up mini Reese’s cups and sprinkle them on top for extra peanut butter candy vibes. This was a game-changer at my last potluck.
- Whipped White Chocolate: Swap the ganache topping for melted white chocolate whipped with cream. It’s a bit sweeter, but oh-so-pretty.
- Crunchy Pretzel Base: Use crushed pretzels instead of cookie crumbs for the crust if you’re craving that salty-sweet contrast. I’ve done this for game night, and it’s always a crowd-pleaser.
These little tweaks keep things fresh, and honestly, I’m still experimenting. Got a wild idea? Let me know what you try!
Servings and Timing
Let’s break down the nitty-gritty of making this Chocolate Peanut Butter Pie. In my experience, this recipe serves about 8-10 people, depending on how generous your slices are (or how sneaky your family is with seconds). I’ve found it’s perfect for a small gathering or just a week of sneaky midnight snacks.
- Prep Time: 25 minutes, if you’ve got everything ready to roll.
- Chill Time: 4 hours minimum, but overnight is best for that set texture.
- Total Time: About 4.5 hours, though most of it’s hands-off.
I usually whip this up in the morning if I’m serving it for dinner. Timing-wise, it’s a breeze!
Step-by-Step Instructions
Alright, let’s roll up our sleeves and make this Chocolate Peanut Butter Pie step by step. I’ve broken this down into manageable chunks based on how I do it in my kitchen, complete with my little tricks to avoid those pesky pitfalls. Trust me, I’ve botched this enough times to know what works!

Step 1: Prepare the Crust
Grab a 9-inch pie dish and let’s get that base ready. Mix your chocolate cookie crumbs, melted butter, and sugar in a bowl until it looks like wet sand—kinda gritty but holds together when squeezed. Press it firmly into the bottom and up the sides of the dish using the back of a spoon or your fingers (I’m a fingers gal myself).
Pop it in the fridge for 15 minutes to firm up while you tackle the filling.
Step 2: Whip Up the Peanut Butter Filling
In a big ol’ mixing bowl, beat the softened cream cheese and peanut butter until smooth—don’t rush this, or you’ll get lumps. Add the powdered sugar and vanilla, mixing until it’s all creamy dreamy. Then, in a separate bowl, whip the heavy cream to stiff peaks (my secret? Chill the bowl first for faster results), and gently fold it into the peanut butter mix.
Spread this luscious filling into your chilled crust, smoothing the top with a spatula.
Step 3: Make the Chocolate Ganache Topping
Heat the 1/2 cup heavy cream in a small saucepan until it’s just simmering—don’t let it boil, or you’ll have a mess! Pour it over the chopped semi-sweet chocolate in a heatproof bowl, let it sit for a minute, then stir until glossy. Drizzle or spread this over your Chocolate Peanut Butter Pie filling, and if you’re feeling extra, sprinkle on those peanut butter chips. I’ve found a little swirl with a toothpick makes it look all fancy with zero effort.
Step 4: Chill and Set
Now, patience is key. Cover your Chocolate Peanut Butter Pie with plastic wrap and let it chill in the fridge for at least 4 hours, though overnight is my go-to for the best texture. I’ve tried cutting corners here, and trust me, it’s worth the wait for that perfect slice. Once it’s set, dig in and enjoy the fruits of your labor!
Nutritional Information
I’m no dietitian, but I always like to know what I’m digging into, especially with something as rich as this Chocolate Peanut Butter Pie. Here’s the rough breakdown per serving (based on 10 slices), so you’ve got a sense of the indulgence factor. I’ve calculated this using standard ingredient values, but it can vary a bit.
- Calories: 480 per slice
- Fat: 34g
- Protein: 9g
- Carbohydrates: 38g
- Sodium: 320mg
It’s definitely a treat, not an everyday snack, but man, every bite is worth it in my book!
Healthier Alternatives
If you’re looking to lighten up this Chocolate Peanut Butter Pie, I’ve got a few swaps I’ve tried when I’m watching my waistline (which, let’s be honest, isn’t always). These tweaks still keep the flavor on point, just with a little less guilt. Give ‘em a shot if you’re feeling health-conscious.
- Lower Fat Cream: Swap the heavy cream for half-and-half in the filling and topping. It’s not as rich, but still pretty darn good.
- Reduced-Fat Cream Cheese: Use a light version instead of full-fat. I’ve done this, and while the texture’s a tad less creamy, it works.
- Sugar Substitute: Replace powdered sugar with a stevia blend or monk fruit sweetener. I’m not huge on artificial stuff, but this cuts calories big time.
- Greek Yogurt Boost: Mix in some plain Greek yogurt with the peanut butter for added protein. I tried this once, and it added a tangy twist I kinda liked.
These won’t make it diet food, but they help balance things out. Play around and see what fits your vibe!
Serving Suggestions
I’ve got some killer ideas for serving up this Chocolate Peanut Butter Pie that’ll make it even more irresistible. I love getting creative with presentation, especially when I’ve got friends over. Here are a few ways I’ve jazzed it up at my table.
- Dessert Party Star: Slice it up and serve with a dollop of whipped cream and a sprinkle of crushed peanuts. It’s my go-to for potlucks—looks pro without much fuss.
- After-Dinner Treat: Pair it with a hot cup of coffee to cut through the richness. I did this at my last dinner party, and it was the perfect wind-down.
- Kid-Friendly Twist: Add a drizzle of chocolate syrup and some sprinkles on top. My little ones lose their minds over this version!
However you serve it, this pie’s gonna be the talk of the table. What’s your favorite way to dish it up?
Common Mistakes to Avoid
I’ve made my fair share of oopsies while perfecting this Chocolate Peanut Butter Pie, so let me save you some heartache with a few pitfalls to dodge. Trust me, I learned these the hard way, and I don’t want you cursing in your kitchen like I did. Here’s what to watch out for.
- Crumbly Crust Chaos: Don’t skimp on the butter or skip chilling the crust—it’ll fall apart when you slice. I’ve had crust disasters that looked like a sandbox!
- Rushing the Chill: Cutting into the pie too soon means a gooey mess. I’ve been impatient before, and it was a sad, sad sight.
- Overwhipping Cream: Whip too long, and you’ve got butter, not fluffy peaks. Guilty as charged on this one—keep an eye on it!
Avoid these slip-ups, and you’re golden. We’ve all been there, right?
Storing Tips
Let’s talk about keeping this Chocolate Peanut Butter Pie fresh for as long as possible—because leftovers are a treasure in my house. I’ve figured out a couple of foolproof ways to store it so it doesn’t lose that wow factor. Here’s what works best for me.
- Refrigerator: Store it covered with plastic wrap or in an airtight container for up to 5 days. I’ve found it tastes even better on day two!
- Freezer: Slice it, wrap each piece in plastic wrap, and freeze for up to 2 months. Thaw in the fridge overnight when you’re ready for round two.
These tricks keep my pie game strong. How do you store your desserts?

Frequently Asked Questions
Got questions about making this Chocolate Peanut Butter Pie? I’ve rounded up the most common ones I get from friends and readers, and I’m answering ‘em straight from my kitchen. Let’s clear up any confusion so you can bake with confidence.
Can I make this Chocolate Peanut Butter Pie ahead of time?
Absolutely! I often make it a day or two in advance for parties. Just keep it chilling in the fridge, and it’ll be ready to impress when you are.
Can I use crunchy peanut butter instead of creamy?
Sure thing, if you like a bit of texture! I’ve tried it, and it adds a nice bite, though the filling won’t be as smooth. Up to you!
What if I don’t have a pie dish?
No worries—use a springform pan or even a square baking dish. I’ve done this in a pinch, and it still slices up fine.
Can I skip the chocolate ganache topping?
Yep, though I think it’s the cherry on top! You could just sprinkle chocolate chips or leave it plain if you’re short on time.
How do I know when the filling is set?
Give it at least 4 hours in the fridge. It should feel firm to the touch. I’ve tested it early once, and it was a runny disaster!
Is there a gluten-free option for the crust?
Definitely—swap the cookie crumbs for gluten-free chocolate cookies. I’ve made this for a celiac friend, and it worked like a charm.
Can I use milk chocolate instead of semi-sweet?
Go for it, though it’ll be sweeter. I prefer semi-sweet for balance, but milk chocolate is awesome if you’ve got a real sweet tooth.
How do I get clean slices?
Dip your knife in hot water and wipe it dry between cuts. This is my little secret for picture-perfect pieces every time!
Conclusion
Well, friends, I hope you’re as pumped as I am to whip up this Chocolate Peanut Butter Pie! It’s honestly one of those recipes that’s brought so much joy to my table, and I can’t wait for it to do the same for yours. So, grab your apron, crank some tunes, and let’s make some sweet memories together. Drop a comment if you try it—I’d love to hear how your pie turns out!