
I’ll never forget the first time I whipped up a batch of Greek Style Loaded Hummus for a family get-together. It was a sweltering summer afternoon, and I wanted something quick, fresh, and crowd-pleasing to set out with drinks before the barbecue got going. Let me tell you, this creamy, flavor-packed dip—piled high with Mediterranean goodies—stole the show before the burgers even hit the grill!
Honestly, I wasn’t sure if my picky eaters would go for it (my youngest used to turn up his nose at anything remotely “healthy”), but they dove right in, scooping it up with pita like it was candy. That’s when I knew I’d stumbled onto a keeper. If you’re looking for a no-fuss appetizer or snack that feels fancy but comes together in a snap, this Greek Style Loaded Hummus is gonna be your new go-to.
Why You’ll Love This Recipe
I’ve found that Greek Style Loaded Hummus checks all the boxes for an easy win in the kitchen. It’s vibrant, versatile, and doesn’t require you to be a gourmet chef to pull off—just a food processor and a little love. Plus, it’s a total crowd-pleaser, whether you’re hosting a party or just munching solo on a Tuesday night.
In my kitchen, this recipe shines because it’s endlessly customizable (more on that later) and feels like a mini vacation to the Mediterranean with every bite. Trust me, once you’ve tasted that creamy hummus base topped with tangy feta and bright veggies, you’ll wonder why you didn’t make it sooner. It’s pure comfort with a fresh twist!
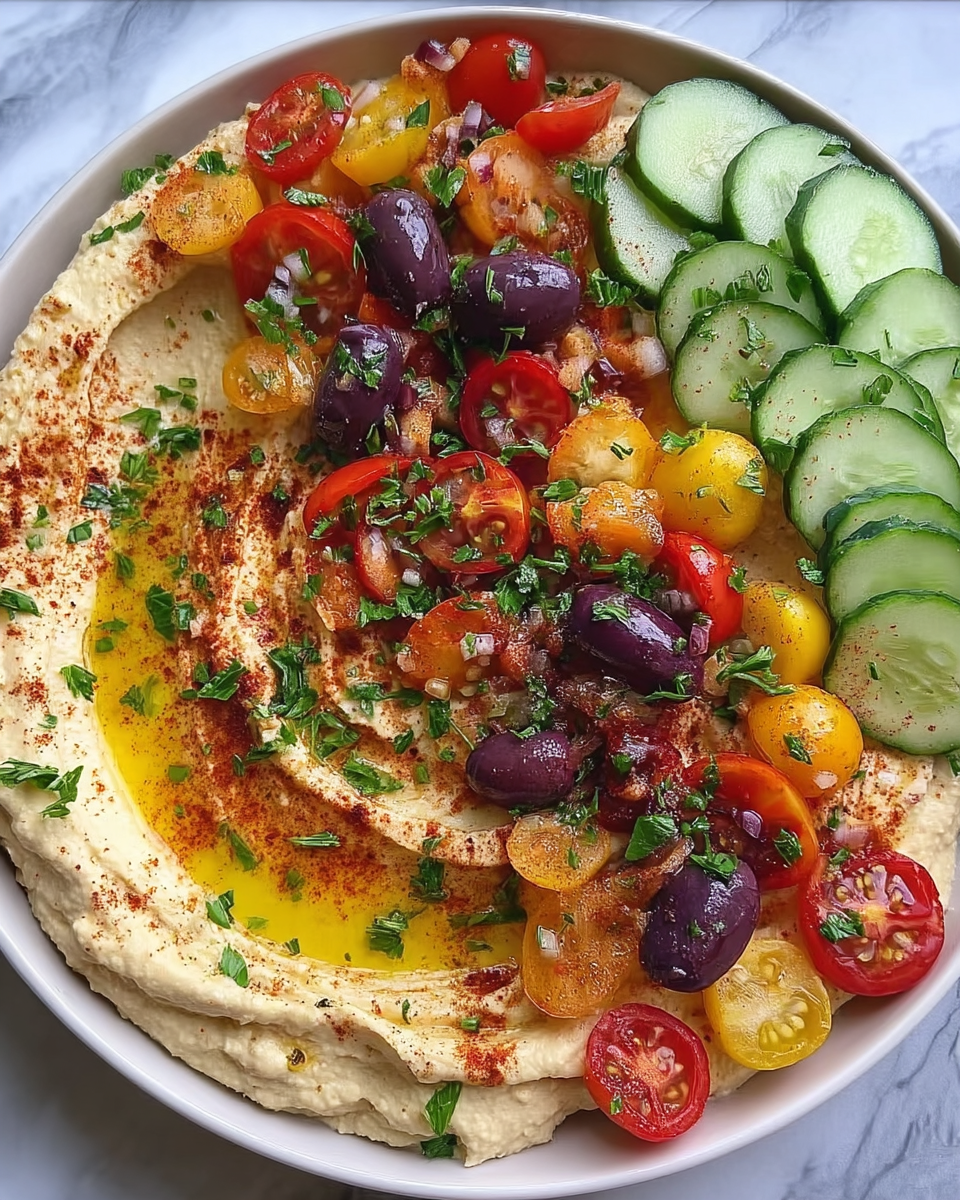
Ingredients List
I’m a bit of a stickler for quality when it comes to making Greek Style Loaded Hummus, so I’ve got my go-to brands and tips for picking the best stuff. You don’t need anything crazy fancy, but fresh ingredients make a world of difference here. I usually buy my chickpeas canned for convenience, though I’ve soaked dried ones when I’m feeling extra ambitious.
Here’s what you’ll need for the hummus base and those drool-worthy toppings. I’ve included exact measurements because, in my experience, eyeballing it can sometimes throw off the texture or balance.
Hummus Base:
- 2 cans (15 oz each) chickpeas, drained and rinsed, for that hearty base
- 1/3 cup (80ml) tahini, well-stirred, for nutty creaminess
- 2-3 cloves garlic, peeled, depending on how punchy you like it
- 1/4 cup (60ml) fresh lemon juice, for brightness (I squeeze my own—store-bought just ain’t the same)
- 1/4 cup (60ml) extra virgin olive oil, plus extra for drizzling, because it’s gotta be lush
- 1/2 teaspoon ground cumin, for a warm, earthy vibe
- Salt to taste, usually about 1/2 teaspoon for me
- 2-3 tablespoons (30-45ml) cold water, to adjust consistency
Loaded Toppings:
- 1/2 cup (75g) crumbled feta cheese, for salty tang (I prefer the block kind over pre-crumbled)
- 1/2 cup (100g) cherry tomatoes, halved, for a juicy pop
- 1/3 cup (50g) diced cucumber, for crunch
- 1/4 cup (40g) Kalamata olives, pitted and halved, for that briny kick
- 2 tablespoons fresh parsley, chopped, for a herby finish
- 1 teaspoon dried oregano, to sprinkle on top for that Greek flair
- A pinch of red pepper flakes, if you’re feeling sassy
Don’t skimp on the olive oil drizzle at the end—it’s like the cherry on top of this savory sundae. If you’ve got a local market with good feta or olives, splurge a little. It’ll elevate your Greek Style Loaded Hummus to straight-up restaurant level!
Variations
Oh, the fun you can have with Greek Style Loaded Hummus! I’ve played around with this recipe more times than I can count, tweaking it based on what’s in my fridge or what I’m craving. Here are some of my favorite twists to keep things fresh—trust me, you’ll wanna try at least a couple of these.
- Spicy Kick: Toss in a pinch of cayenne or a drizzle of hot sauce to the hummus base for a fiery edge. I tried this once for a game night, and my friends couldn’t stop raving (or reaching for water!).
- Roasted Red Pepper: Blend in 1/2 cup of jarred roasted red peppers with the chickpeas for a sweet, smoky vibe. It turns the hummus a gorgeous orange hue!
- Herby Bliss: Mix a handful of fresh dill or mint into the base or sprinkle on top. My kids always ask for this version—it feels extra summery.
- Nutty Crunch: Sprinkle toasted pine nuts or chopped almonds over the toppings for texture. I love the little “pop” it adds.
- Meat Lover’s: Add some chopped gyro meat or grilled chicken on top if you’re not keeping it veggie. I did this for a hearty lunch, and it was a game-changer.
- Avocado Twist: Mash half an avocado into the hummus for extra creaminess and a modern spin. It’s my guilty pleasure!
- Pomegranate Pop: Scatter pomegranate seeds on top for a sweet-tart contrast and a festive look. I did this for a holiday party, and it was almost too pretty to eat.
- Everything Bagel Vibes: Sprinkle everything bagel seasoning over your Greek Style Loaded Hummus for a trendy, savory twist. It’s weirdly addictive, I’m telling ya.
These variations keep the recipe exciting, and honestly, I’m still dreaming up new ones. Got a funky topping idea? Let me know—I’m all ears!
Servings and Timing
I’ve made Greek Style Loaded Hummus for everything from quick snacks to big parties, and it’s super flexible depending on your crowd. In my experience, this recipe serves about 6-8 people as an appetizer, especially if you’ve got other nibbles on the table. If it’s the main star, count on 4-5 hearty portions.
Here’s the timing breakdown, based on how long it usually takes me:
- Prep Time: 15 minutes (if I’m not dawdling)
- Cook Time: 0 minutes (no cooking needed, hallelujah!)
- Total Time: 15 minutes, start to finish
I’m telling you, it’s perfect for those “oh shoot, guests are coming in 20 minutes” moments. Just chop, blend, and pile it on!
Step-by-Step Instructions
Making Greek Style Loaded Hummus is a breeze, but I’ve got a few tricks up my sleeve to make it extra tasty. I’ll walk you through it like I’m right there in the kitchen with you. Let’s get this party started!

Step 1: Prep Your Chickpeas
First things first, drain and rinse those chickpeas under cold water. I’ve learned that giving them a good rinse cuts down on that canned “tinny” taste. If you’re feeling fancy, you can even peel the skins off for smoother hummus, but honestly, I skip that 90% of the time—it’s still delish.
Step 2: Blend the Base
Toss the chickpeas, tahini, garlic, lemon juice, cumin, and a pinch of salt into a food processor. Blitz it up, drizzling in the olive oil as it spins, until it’s creamy. I usually add a couple tablespoons of cold water to loosen it up—trust me, that’s the secret to velvety Greek Style Loaded Hummus.
Step 3: Taste and Tweak
Give it a quick taste (chef’s perk!). If it needs more zing, squeeze in extra lemon juice; if it’s too thick, splash in more water. I’ve botched this step before by not tasting, and let’s just say too much garlic can clear a room—adjust as you go.
Step 4: Load It Up
Spread the hummus onto a shallow bowl or platter, making little swoops with a spoon for that Instagram-worthy look. Pile on the toppings—feta, tomatoes, cukes, olives, parsley, oregano, and a pinch of red pepper flakes if you’re me. Finish with a generous drizzle of olive oil to make your Greek Style Loaded Hummus shine.
Step 5: Serve and Enjoy
Grab some warm pita bread, crackers, or veggie sticks, and dig in! I love watching my family hover over the bowl, scooping away. It’s the easiest way to look like a pro chef without breaking a sweat.
Nutritional Information
I’m not gonna lie, I don’t obsess over calories, but I do like knowing the basics about my Greek Style Loaded Hummus. This is a rough estimate per serving (based on 8 portions), and it’s a pretty balanced bite in my book. Here’s the breakdown:
- Calories: 220 per serving
- Fat: 14g
- Protein: 7g
- Carbohydrates: 18g
- Sodium: 380mg
It’s filling without being heavy, and you’re getting some good protein from the chickpeas. I think it’s a solid snack or light meal, especially if you pair it with veggies!
Healthier Alternatives
If you’re watching what you eat, I’ve got a few swaps for Greek Style Loaded Hummus that I’ve tried and loved. They don’t skimp on flavor, I promise. Here are my go-to tweaks when I’m trying to lighten things up.
- Low-Fat Feta: Swap regular feta for a reduced-fat version to cut some calories without losing that salty punch. I’ve done this plenty, and it still tastes fab.
- Less Oil: Use just 2 tablespoons of olive oil in the base and skip the drizzle on top. When I’m cutting back, this works fine, though I miss that glossy finish a tad.
- Extra Veggies: Bulk up the toppings with more cucumbers and tomatoes to stretch the portions and add fiber. It’s my sneaky way to make Greek Style Loaded Hummus even more filling!
Serving Suggestions
I love serving Greek Style Loaded Hummus in ways that make it feel special, even on a random weeknight. Here are a few ideas straight from my table to yours—mix and match depending on the vibe you’re going for.
- Party Appetizer: Set it out with warm pita wedges and a pile of carrot sticks for dipping. It’s a hit at every gathering I’ve hosted!
- Light Lunch: Pair it with a simple green salad for a Mediterranean-inspired meal. At my last solo lunch, I couldn’t stop eating this combo.
- Snack Attack: Keep it in the fridge for a quick grab-and-go with crackers. It’s saved me on many a hangry afternoon!
Common Mistakes to Avoid
I’ve flubbed Greek Style Loaded Hummus a few times over the years, so let me save you the headache. Trust me on this one—I learned the hard way! Here are the pitfalls to dodge.
- Over-Blending: Don’t process the hummus too long, or it can get gummy. I did this once, and the texture was just… sad.
- Skimping on Seasoning: Forgetting to taste and adjust the salt or lemon can leave your Greek Style Loaded Hummus bland. I’ve served a batch like this before, and my husband politely hinted it needed “something.”
- Soggy Toppings: Don’t add the veggies too early if you’re not serving right away—they’ll release water and make it mushy. Learned that one after a picnic disaster!
Storing Tips
I’ve found that Greek Style Loaded Hummus keeps pretty well if you store it right. Here’s how I make sure it stays fresh for as long as possible, based on my trial and error.
- Refrigerator: Store in an airtight container for up to 4-5 days, but keep the toppings separate until serving to avoid sogginess.
- Freezer: Freeze just the hummus base (no toppings) for up to 2 months in a freezer-safe container. Thaw overnight in the fridge, stir, and load it up fresh!

Frequently Asked Questions
I get a lot of questions about making Greek Style Loaded Hummus, so I’ve rounded up the most common ones. Here are my answers, straight from the heart of my kitchen. Let’s dive in!
Can I make Greek Style Loaded Hummus ahead of time?
Absolutely! You can whip up the hummus base a day or two in advance and store it in the fridge. Just add the toppings right before serving to keep everything crisp and fresh.
Do I need a food processor?
It’s the easiest way, for sure, but a blender works in a pinch. I’ve even mashed it by hand with a fork when camping—takes elbow grease, but it’s doable!
Can I use dried chickpeas?
Yes, and they’re amazing if you’ve got the time. Soak them overnight, cook until tender, then proceed. I’ve done it a few times, and the flavor is next-level.
What if I don’t like olives?
No worries—skip ‘em! Swap in extra tomatoes or even some chopped roasted peppers for a different vibe. I’ve got olive haters in my house, so I get it.
Is this recipe vegan?
It can be! Just ditch the feta or use a vegan alternative. I’ve made it this way for friends, and it’s still a hit.
How do I get super smooth hummus?
The trick is cold water and a little patience with blending. Also, peeling the chickpeas helps, though I usually skip it unless I’m feeling fancy.
Can I double the recipe?
Totally! I’ve doubled it for big parties, and it scales perfectly. Just make sure your food processor can handle the volume.
What’s the best pita to serve with it?
I’m partial to fresh, fluffy pita from a local bakery, warmed up a bit. Store-bought works too—just toast it lightly for extra oomph!
Conclusion
I hope you’re as pumped as I am to try this Greek Style Loaded Hummus in your own kitchen. It’s become such a staple for me, and I’d love to hear how it turns out for you—drop a comment with your fave toppings or tweaks! Honestly, there’s nothing like sharing a big bowl of this goodness with people you love, so go ahead and whip up some Mediterranean magic.